
Most Open Payments (opens in a new tab) examples run on a server or in a browser. But a lot of people send money from their phone. So we asked a simple question: can a mobile app use Open Payments to send money from the user’s own wallet, without making the user log in again for every payment?
The answer is yes. In this post, we build a small proof of concept (PoC) with Expo (opens in a new tab) and React Native. The app runs against the Interledger Test Wallet (opens in a new tab), a sandbox platform where you can safely test ILP integrations using play money.
This is a hands-on guide for anyone who wants to build a mobile app with Open Payments. You can follow it step by step, run the app, and build your own idea on top of it.
What you will build
The app has four tabs:
- Wallet: connect your wallet. Your wallet first confirms that you own the address. Then the phone creates its own key and adds it to your wallet.
- Send: a list of contacts. Pick a contact, type an amount, tap Proceed, approve the payment in your wallet, done.
- History: every transfer made from the app, with live status from the wallet.
- Budget: a second payment flow. The app’s backend holds the key, and the user approves a monthly budget once for the connected wallet. We don’t cover it in this post.
In the animation below you can see how we are able to see our contacts, select to pay one (in this instance, Marian), and send her 5 Euros, reaching the wallet’s real consent page, shown inside the app. The user is already logged in, so they only tap Accept. After the tap, the screen closes by itself, and the app makes the payment.
Before you start
You need three Test Wallet addresses and a developer key configured on your backend (see the setup instructions below).
Start by signing up at wallet.interledger-test.dev (opens in a new tab) using a valid email address. Complete the simulated KYC process and add some test funds.
You’ll need three wallet addresses:
- Sender: Your personal wallet address, which you’ll use to initiate payments.
- Receiver: A second wallet address representing the payment recipient. It can use a different currency (e.g., USD to MXN) to test cross-currency payments.
- Application: A dedicated wallet address representing your mobile app. Your backend will use its associated developer key to interact with Open Payments on behalf of the app.
Give the application wallet a recognizable public name, such as “My Mobile App”, as this name will appear in the sender’s wallet when requesting payment authorization.
Get the code (opens in a new tab) and run it:
git clone https://github.com/interledger/open-payments-react-native-example.git
cd open-payments-react-native-example/server
npm install
npm run gen-key        # prints a public key: upload it in the Test Wallet under Settings → Developer Keys
cp .env.example .env   # set CLIENT_WALLET_ADDRESS, KEY_ID and PRIVATE_KEY_PATH
npm run dev
Then install the app and run the app commands:
cd ../app
npm install
npx expo run:ios       # or: npx expo run:android
The big picture
Before digging into the code and adapting it to your needs, here are four ideas that make this mobile app example work.
1. The example is made with the end user experience in mind. For this I choose to use two clients: a small backend and the phone. In Open Payments, every request is signed by a client. The auth server finds the client’s public key at {walletAddress}/jwks.json.
- When you connect, the client is the app’s backend. It has its own wallet address and key, so it can ask your wallet to confirm you own the address before the phone has any key.
- After that, the client is your own wallet address, with a key that lives on the phone. This is the same model the Web Monetization extension (opens in a new tab) uses. Sending money never goes through the backend.
2. The phone signs every request. The official JavaScript SDK depends on Node.js crypto, so it does not run in React Native. Instead, the app has a small client (about 200 lines) built on fetch. It signs each request with HTTP Message Signatures (opens in a new tab). Work is in progress to make the official JavaScript SDK work on mobile devices.
3. The wallet runs in an in-app WebView. Login and consent happen on the wallet’s own web pages. A WebView keeps its cookies when the app restarts. So the user logs in once, inside the app, and after that every consent screen opens directly. The Test Wallet session lasts about one month.
4. Open Payments only supports redirects in the interaction flow. The auth server sends the user to the wallet’s consent page, and then redirects back to a finish URI with an interact_ref and a hash. Our finish URI is openpayments-rn-example://op/finish. The WebView catches this redirect, closes, and gives the values to the app.
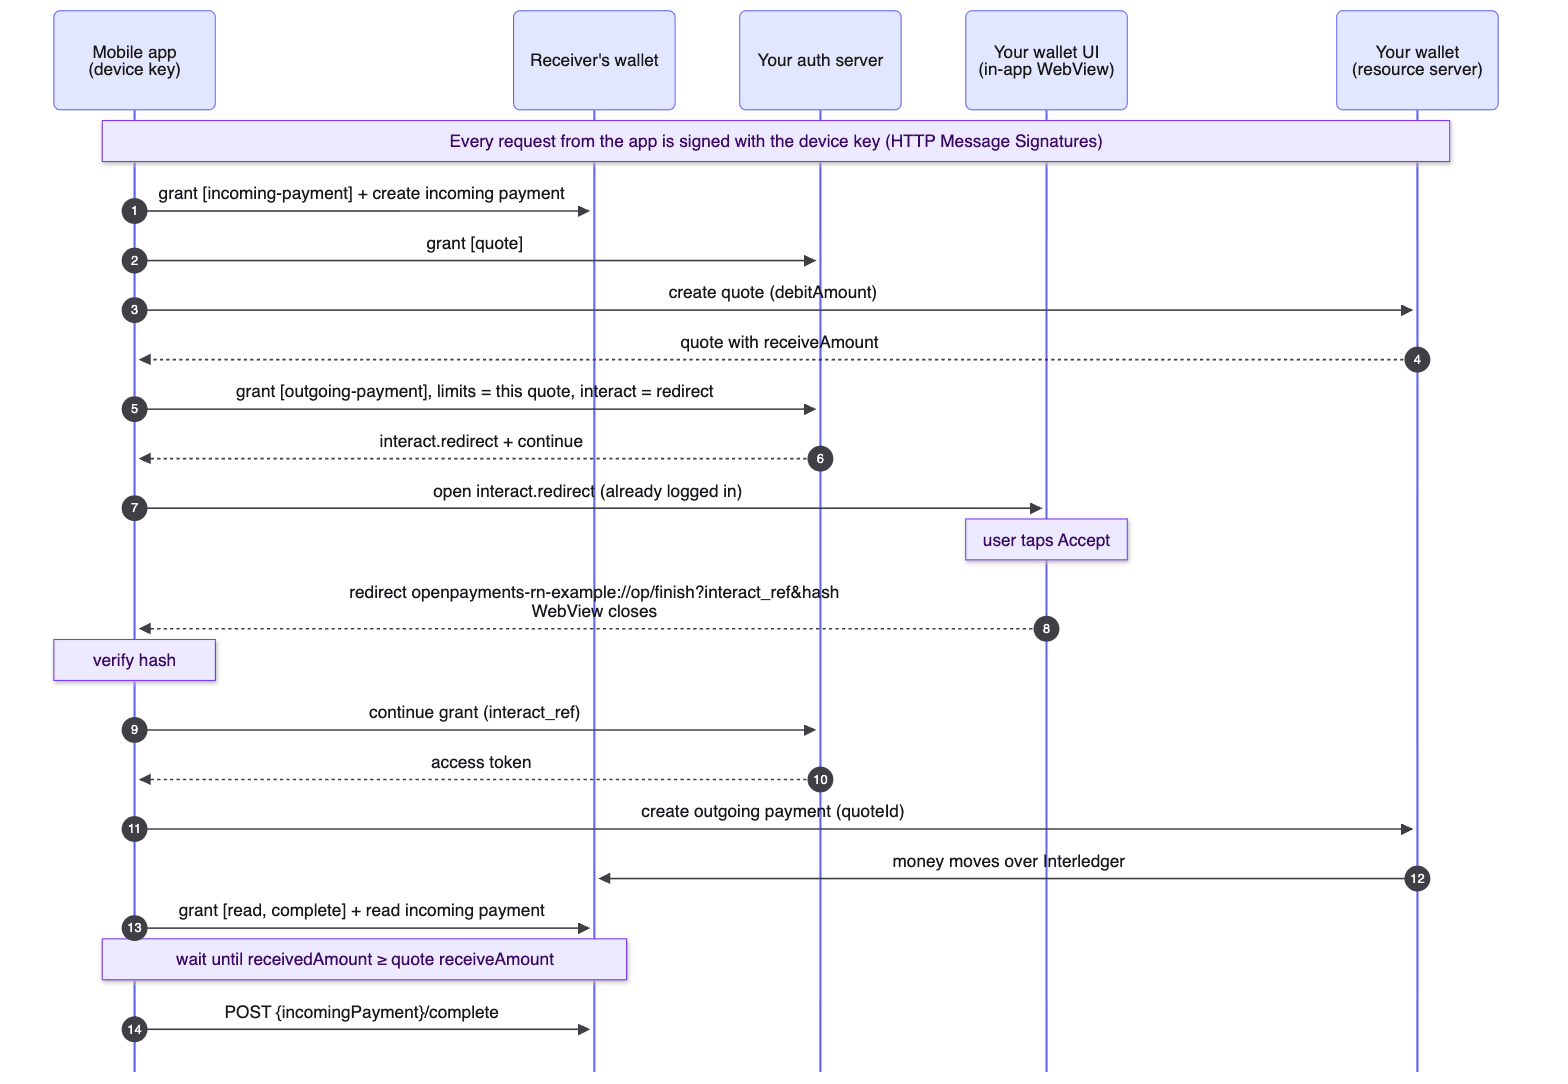
All the phone’s Open Payments code lives in app/src/op/. It has no React Native imports, so you can also run it from Node.js (there is a smoke test script for that). The backend is in server/.
Step 1: Connect: confirm you own the wallet address
The user types their wallet address. Before the phone creates any key, we want the wallet to confirm the user really owns this address. Open Payments has a flow for this: verify wallet address ownership (opens in a new tab). For this we’ll use the server configured Open Payments client. It is an interactive grant with a subject instead of an access_token. It gives no payment rights. It only asks the wallet: “is this user the owner of this address?”
There is one catch: every grant request must be signed by a client whose key the wallet already knows. The phone has no key on the user’s wallet yet. So the app’s backend sends this request, signed with its own key:
const walletAddress = await client.walletAddress.get({ url: userWalletAddressUrl })
const grant = await client.grant.request(
  { url: walletAddress.authServer },
  {
    subject: { sub_ids: [{ id: walletAddress.id, format: 'uri' }] },
    interact: {
      start: ['redirect'],
      finish: { method: 'redirect', uri: 'openpayments-rn-example://op/finish', nonce }
    }
  }
)
// the app opens grant.interact.redirect in its WebView ...
The app opens grant.interact.redirect in the in-app WebView. This is the only time the user logs in to their wallet. The Test Wallet then confirms ownership by itself after a few seconds, and redirects to our finish URI. The app sends the redirect values to the backend. The backend checks the hash, continues the grant, and checks that subject.sub_ids contains the same address. Then it cancels the grant, because it has no other use.
Since the backend runs on Node.js, it uses the official @interledger/open-payments (opens in a new tab) SDK.
In the following animation: 1) the user types their address and taps Connect, then 2) signs in to the wallet. That is the only thing they do. 3) The wallet then confirms ownership by itself and sends them back to the app:
Step 2: Create a key on the phone
Your wallet confirmed you own the address. Only now does the phone create its own Ed25519 key pair, with @noble/ed25519 (opens in a new tab).
import * as ed from '@noble/ed25519'
import { sha512 } from '@noble/hashes/sha2.js'

ed.hashes.sha512 = sha512

export function publicJwk(key: DeviceKey): Jwk {
  return {
    kid: key.keyId, // a random UUID
    kty: 'OKP',
    crv: 'Ed25519',
    alg: 'EdDSA',
    x: toBase64Url(ed.getPublicKey(key.privateKey))
  }
}
The 32 random bytes come from expo-crypto. The private key goes to the iOS Keychain (or Android Keystore) with expo-secure-store. It never leaves the phone. Note: the iOS Secure Enclave does not support Ed25519, so the Keychain is the best option here.
Step 3: Add the key to the wallet, automatically
The auth server must find the device key in the wallet’s jwks.json. By design, Open Payments has no API to register a key, so each wallet does it in its own way. On the Test Wallet, you can paste the key on the Developer Keys page. That works, but we wanted to skip the copy and paste.
What’s coming: directed identity. Open Payments has a second way for a client to identify itself, called directed identity (opens in a new tab). Instead of pointing to a wallet address whose jwks.json lists its keys, the client sends its public key (client: { jwk }) inside the grant request. The auth server then checks the signatures against that key. Today this works only for non-interactive grants, such as incoming payments and quotes. Support for interactive grants is planned. Once it becomes supported, a mobile app may not need to add its key to the wallet at all, and Step 1 would no longer need the backend.
The Web Monetization extension solves this with a content script that runs inside the logged-in wallet page. A WebView lets us do the same thing. The app opens the Developer Keys page and injects a small script. The user is already signed in from Step 1, so this happens without any input.
// Runs inside https://wallet.interledger-test.dev, so the wallet's own
// session cookie authenticates these calls.
const api = 'https://api-' + location.host
const res = await fetch(api + '/accounts?include[]=walletAddresses&include[]=walletAddressKeys',
  { credentials: 'include' })
const accounts = (await res.json()).result
// ... find the account and wallet address that match ours, then:
await fetch(api + '/accounts/' + accountId + '/wallet-addresses/' + walletAddressId + '/upload-key', {
  method: 'POST',
  credentials: 'include',
  headers: { 'content-type': 'application/json' },
  body: JSON.stringify({ base64Key: btoa(JSON.stringify(jwk)), nickname: 'Open Payments RN Example' })
})
window.ReactNativeWebView.postMessage(JSON.stringify({ type: 'key-upload', ok: true }))
The app never sees the password or the cookie. When the script reports success, the WebView closes, and the app checks jwks.json to confirm the key is there. From now on, every Open Payments request for sending money is signed by the phone, with the user’s own wallet address as the client.
A note for real products: this trick depends on the wallet’s private API. It works for the Test Wallet, but it is not a standard. On the next image, the Wallet tab shows all three connection steps as done:
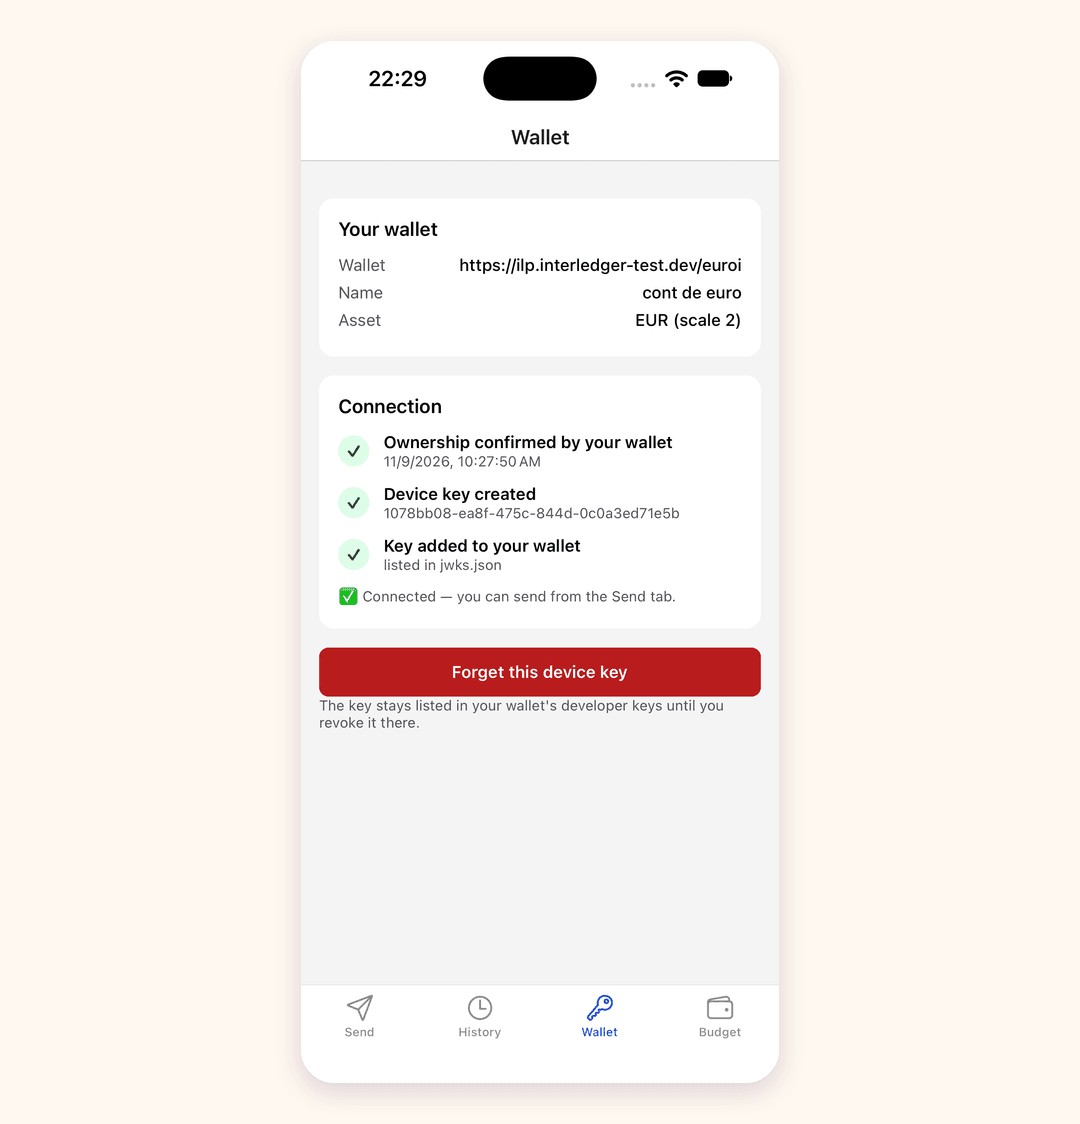
Now the wallet is connected. This is done only once.
Step 4: Sign every request
Open Payments uses HTTP Message Signatures. For each request, the app builds a “signature base” string and signs it with the device key:
const components = ['@method', '@target-uri']
if (headers['authorization']) components.push('authorization')
if (body) components.push('content-digest', 'content-length', 'content-type')

const params = '(' + components.map((c) => '"' + c + '"').join(' ') + ')'
  + ';keyid="' + key.keyId + '";created=' + Math.floor(Date.now() / 1000)

const base = components.map((c) => '"' + c + '": ' + valueOf(c)).join('\n')
  + '\n"@signature-params": ' + params

headers['signature-input'] = 'sig1=' + params
headers['signature'] = 'sig1=:' + toBase64(ed.sign(utf8(base), key.privateKey)) + ':'
The content-digest header is sha-512=:<base64>: of the JSON body. Signatures are easy to get wrong, so the unit tests check our output with @interledger/http-signature-utils, the same library Rafiki (opens in a new tab), the Open Payments implementation server, uses to validate signatures.
Step 5: Send money to a contact
Each payment uses its own interactive grant. It is a normal checkout: the user sees the exact amount and approves it. The flow has three parts.
Prepare. The app creates an incoming payment at the receiver’s wallet, then a quote at your wallet, then asks for an outgoing payment grant that is limited to exactly this quote:
// 1. Incoming payment at the receiver (non-interactive grant)
const incomingGrant = await client.requestGrant(receiver.authServer, {
  access_token: { access: [{ type: 'incoming-payment', actions: ['create', 'read', 'complete'] }] }
})
const incomingPayment = await client.createIncomingPayment(
  receiver.resourceServer, incomingGrant.access_token.value, receiver.id)

// 2. Quote at the sender (non-interactive grant)
const quote = await client.createQuote(sender.resourceServer, quoteToken, {
  walletAddress: sender.id, receiver: incomingPayment.id, method: 'ilp',
  debitAmount: { value: '100', assetCode: 'USD', assetScale: 2 } // 1.00 USD
})

// 3. Outgoing payment grant (interactive), for this payment only
const grant = await client.requestGrant(sender.authServer, {
  access_token: {
    access: [{
      type: 'outgoing-payment',
      actions: ['create', 'read'],
      identifier: sender.id,
      limits: { debitAmount: quote.debitAmount, receiver: incomingPayment.id }
    }]
  },
  interact: {
    start: ['redirect'],
    finish: { method: 'redirect', uri: 'openpayments-rn-example://op/finish', nonce }
  }
})
User presses Approve to accept the grant. The app opens grant.interact.redirect in the WebView. The user sees “Your Wallet Name is requesting access to $1.00” and taps Accept. The wallet redirects to our finish URI. The WebView catches it before loading it, and closes:
<WebView
  source={{ uri: redirectUrl }}
  originWhitelist={['*']} // so our custom scheme reaches the handler below
  onShouldStartLoadWithRequest={(request) => {
    if (request.url.startsWith('openpayments-rn-example://op/finish')) {
      onFinish(parseQuery(request.url)) // { interact_ref, hash } or { result: 'grant_rejected' }
      return false // don't load it; the modal closes
    }
    return true
  }}
/>Pay. The app checks the hash, continues the grant to get an access token, and creates the outgoing payment:
// hash = base64(sha256(clientNonce + '\n' + interact.finish + '\n' + interact_ref + '\n' + authServer))
if (!verifyInteractionHash({ clientNonce, asFinishNonce, interactRef, grantEndpointUri, receivedHash })) {
  throw new Error('Interaction hash mismatch')
}
const finalized = await client.continueGrant(continueUri, continueToken, interactRef)
const payment = await client.createOutgoingPayment(sender.resourceServer, finalized.access_token.value, {
  walletAddress: sender.id,
  quoteId: quote.id
})
Always check the hash. It proves that the redirect really comes from your wallet’s auth server and belongs to this grant.
Step 6: Complete the incoming payment
This step is easy to forget. We fixed the amount on the sender side (debitAmount), so we created the incoming payment without an incomingAmount. In this case, the receiver’s wallet does not know when the payment is finished. The incoming payment stays open until it expires.
The fix is in the docs (opens in a new tab): when you are done sending, call POST {incomingPayment}/complete. For this, you need the complete action on an incoming payment grant. Incoming payment grants are non-interactive, so the app asks for a fresh one when it needs it:
const grant = await client.requestGrant(receiverAuthServer, {
  access_token: { access: [{ type: 'incoming-payment', actions: ['read', 'complete'] }] }
})
const token = grant.access_token.value

// Wait until the receiver got the quoted amount
let incoming = await client.getIncomingPayment(incomingPaymentId, token)
while (BigInt(incoming.receivedAmount.value) < BigInt(quote.receiveAmount.value)) {
  await sleep(1000)
  incoming = await client.getIncomingPayment(incomingPaymentId, token)
}
await client.completeIncomingPayment(incomingPaymentId, token) // POST .../complete
One thing that you should understand about how OP works and how you can use the amount values: the quote’s receiveAmount (also shown on the outgoing payment) is only what the quote promised the receiver would get. It doesn’t confirm what was actually received. The outgoing payment’s sentAmount doesn’t tell you either, because Rafiki reports it in the sender’s currency. To know the money really arrived, check the receiver’s side: the incoming payment’s receivedAmount, in the receiver’s currency. Complete the incoming payment once it reaches the quoted amount.
Step 7: History and live status
The History tab lists every transfer made from the app. Tap one to see its live status from the wallet: completed, processing, or failed, and how much was delivered.
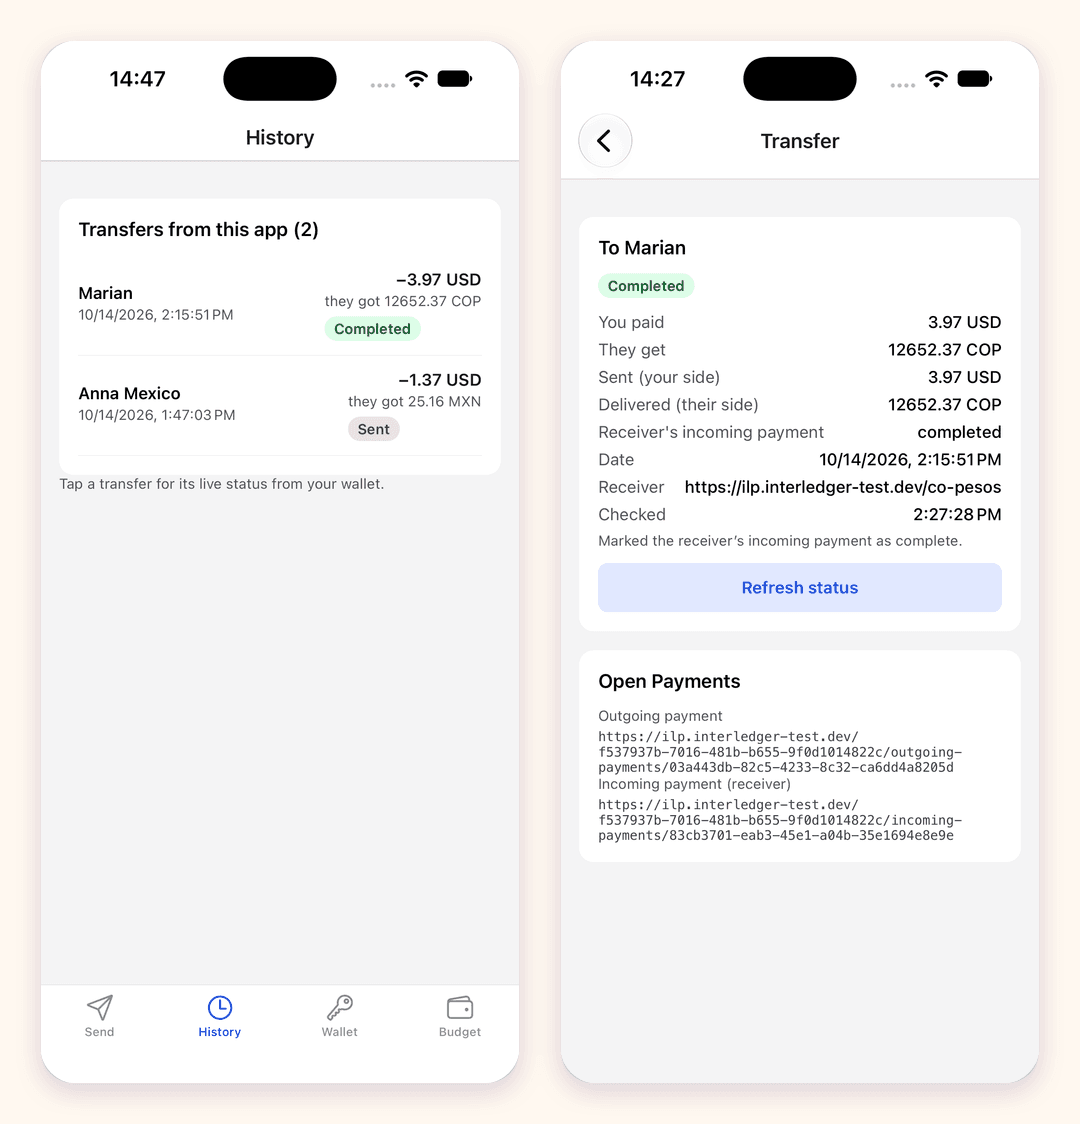
To read the payment later, the app keeps the payment’s grant in the Keychain. This is safe: the grant is limited to that exact payment, which is already spent, so it cannot move more money. Access tokens expire after 10 minutes. When that happens, the app rotates the token with the grant’s manage URL, without asking the user:
try {
  return await client.getOutgoingPayment(paymentUrl, grant.accessToken)
} catch (error) {
  if (!isExpiredToken(error)) throw error // 401, or 403 "Inactive Token"
  const { access_token } = await client.rotateToken(grant.manageUrl, grant.accessToken)
  return await client.getOutgoingPayment(paymentUrl, access_token.value)
}
The detail page also completes the incoming payment if it is still open, for example, when the user closes the app too early.
Things we learned
- For starting the interaction and for finishing it, only the
redirectmethod is supported. You can check it in your console on any auth server at/discovery, for example run:curl https://auth.interledger-test.dev/discovery - Start and finish in the same browser. Rafiki checks a session cookie at
/interact/.../finishthat it set at the start. If the consent page moves to another browser or app in the middle, the grant fails withinvalid session. - A WebView keeps the login; the system browser does not let you script.
ASWebAuthenticationSession(iOS) and Custom Tabs (Android) share cookies with Safari or Chrome, and they are the recommended option for real login. But you can’t inject a script into them, so automatic key upload is not possible there. - The consent screen shows the client’s name. When you connect, the client is the app’s backend, so the wallet shows the app’s wallet name: pick a clear one. For payments, the client is the user’s own wallet address, so the screen says, for example, “just dollars is requesting access to $1.00”. The Test Wallet shows the amount, but not the receiver.
- Complete the incoming payment. If this step is not done, then only the incoming payment expiration time will trigger the completion of incoming payment.
- Check delivery on the receiver side.
sentAmountuses the sender’s currency. - Directed identity doesn’t replace key upload, yet. The newer
client: { jwk }option sends the public key in the request body instead of looking it up injwks.json. Today Rafiki only accepts it for non-interactive grants (incoming payments and quotes), so outgoing payments still need a key injwks.json. Support for interactive grants is planned. Once it lands, the phone could do the ownership check itself, without the backend. - To verify first, you need a client that already has a key. An interactive grant, like the ownership check, must be signed by a client whose key the wallet knows. A brand-new phone has none, so the backend, with its own wallet address and key, runs that first step.
- iOS 27 needs the scene life cycle. With the iOS 27 SDK, apps that don’t use it crash at launch. Expo SDK 57 already has the scene delegate; the repo includes a small config plugin that enables it.
What to build next
Some ideas, from easy to hard:
- Request money: create an incoming payment with an
incomingAmountand share it as a QR code. - Split the bill: send to several contacts with one confirmation each.
- Recurring payments: ask for an outgoing payment grant with an
interval(for exampleR/2026-10-18T00:00:00Z/P1M) and pay every month without new consent. Our subscriptions PoC shows this on a server. - Full wallet history: ask for a read-only grant (
outgoing-paymentwithlistandread) and show all payments, not only the ones made from the app. - Android: the code is cross-platform, but we only tested it on the iOS Simulator.
Closing
This PoC shows that a mobile app can work with Open Payments end to end:
- It connects to the user’s wallet with a standard ownership check before it trusts the device.
- It keeps its own key on the phone and adds it to the wallet automatically.
- It sends money with a clear, per-payment approval.
- It finishes the payment on both sides.
The in-app WebView is the reason the user logs in only once.
The code is in the open-payments-react-native-example repository (opens in a new tab). It is experimental and meant as a starting point, not a production wallet. You can find the Open Payments docs at openpayments.dev (opens in a new tab). If you build something with it, or you get stuck, tell us on the Interledger Slack (opens in a new tab) or open an issue on GitHub.
Happy building! 🚀